Tuesday, August 31, 2010

A Lilly Pulitzer Setting

I don't know about you 
but I love Lilly Pulitzer!
There is such a distinct look about her...
You can recognize her anywhere...
Maybe it's those fabulous preppy colors...
Well...
I immediately was in love with this little set up
the moment I laid eyes on it...
Thank you Couture Parties for making my day!

Now...
Can I tell you that she used a duvet cover
that she bought at an estate sale?
Brilliant!


The place card holders are little Lilly shift dresses...
You can die now...
I did...

Of course for the favors...

Love these boxes...

Bingo!  In Lilly colors!...
Actually you can download these from Martha...

My most favorite...
Seriously you are going to scream when you peek...
These drink stirs are Louis bags...
Go ahead...
Start screaming...

Told you it was to die for...
Pop over to their site for more or to download the Bingo game...

Monday, August 30, 2010

Doggie Delights

This weekend I let Goosie Girl whip up some treats
for Spooky...
He was most delighted with these homemade morsels...
In fact, he stood at the table & whined when they were cooling...
I do believe they are his favorite...
and they are much better than a normal treat...
I stumbled across the recipe from The Crafting Chicks...
They found it on Martha Stewart...
It was incredibly easy...
So here goes...
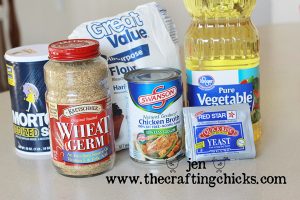
homemade dog treats 3 copy
1 cup flour
1/4 cup wheat germ
1/2 cup low sodium chicken broth (you can also use peanut butter)
1 packet yeast
1 teaspoon salt
1-1/2 tablespoons vegetable oil


Mix all together
Bake in a 350 degree oven for 12 minutes

Friday, August 27, 2010

Sweet Friday

Happy Friday!
May your weekend be sweet!
{image via Hip Hip Hooray}

Thursday, August 26, 2010

Back To School Printables

Look at these back to school printables 
that I found on My Owl Barn...
You know how much I love owls...
So these were right up my alley...
I especially love the little joke cards...
Click here to download...


4926498906_b8afd2f6a5.jpg


4926498910_8ec37e00bd_b.jpg


4926498908_16c20b7861.jpg


{Printables created by My Delightful Designs}

Wednesday, August 25, 2010

Beach Sweets

With Labor Day approaching, 
summer ending
and one last beach hoorah...
How cute would these sweet treats be for dessert?
Both are complements of Martha Stewart...


Tuesday, August 24, 2010

A Butterfly Birthday

I love this party that A Blissful Nest created for her daughter's birthday...
That yellow & white stripe is stunning with the pink!
Don't you just love to look at parties?
Doesn't it put you in the best mood?
Love this wreath...

and these favor boxes...


Monday, August 23, 2010

Party Box Design

I feel like I know Jessica from Party Box Design...
We've communicated via blogs...
And I've really seen her business blossom...
I can see why...
She's amazingly talented...
Take a peek at some of her creations...


I told you...

Pop over to her site for more delicious eye candy!

Friday, August 20, 2010

Sweet Friday

Here's a "sweet" project that you can try out this weekend...
A make your own fabric cupcake...
Here are the details from Icing Designs...

All you really need is some great fabric, complimenting ribbon, a piece of half sphere and a piece of cylinder Styrofoam, scissors and a glue gun.
First off just take some strips of ribbon (about 3 inches long, you will need about 20 strips depending on the size of the cylinder you purchased. (You can also use yarn for the cupcake wrapper instead of ribbon, if you prefer)Take your glue gun and add some glue to the top of the cylinder, place your ribbon on it and then pull the ribbon down and attach with glue underneath. Repeat this process, slightly overlapping the ribbon each time, until you have covered your cylinder. This will be your cupcake wrapper.

There may be a overlay on the bottom and you can just trim this off.
Next take a piece of fabric (about 8"x8"), turn it pattern side down and place your half sphere in the center of it.
You are now going to take little parts of fabric at a time and glue them down to the flat part of the half sphere. You will have to fold the fabric a little bit to make the top smooth. If you find you have to much fabric, just trim as you go along. Don't worry if it looks sloppy no one will see this part.

After you have completed the top, put glue all of the top of the cylindar and the bottom the half sphere and place them together.
Then you can add glue along the seem where the top and bottom were combined and add a ribbon, make sure it is long enough to tie a bow. You can even add a little crystal in the center of the bow. Decorate the top any way you please, with fabric flowers or a fabric cherry, we just made a ribbon rosette and leaf.


Thursday, August 19, 2010

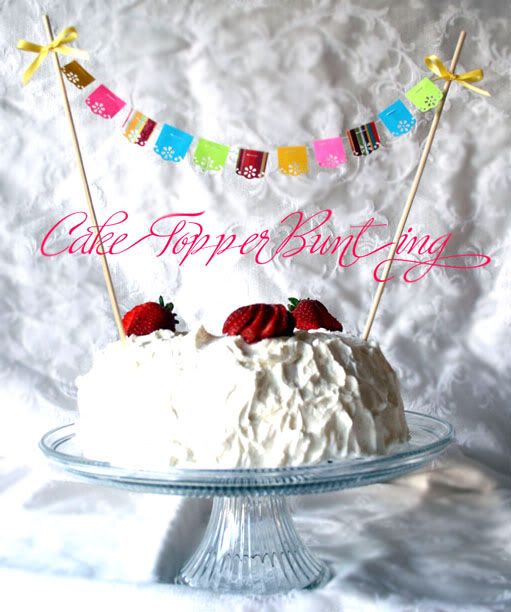
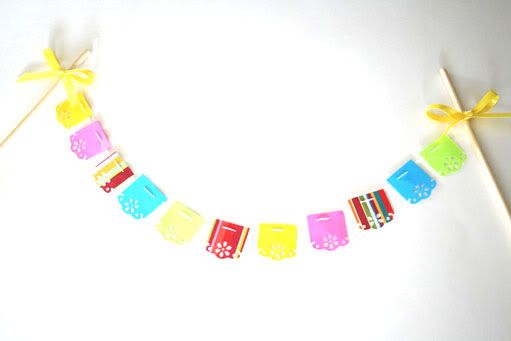
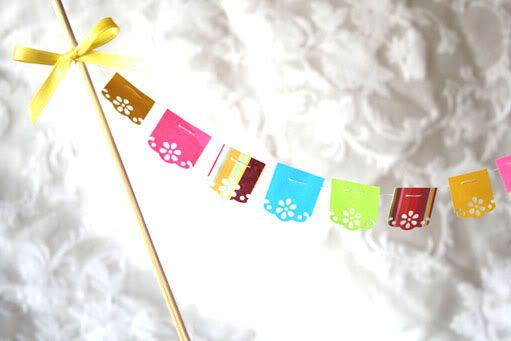
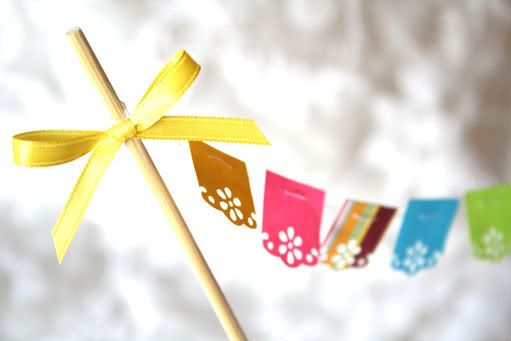
Cake Topper Bunting

I love the use of flag bunting at parties...
So when I started to see it used as decorations
on cakes, I was swooning!
But wait...
It gets better...
Nikki from Lovely Scribbles (who is related to Jenna from Eat, Drink, Pretty both of which have cohosted gorgeous parties in the past few weeks) gives us the 411 on how to make them...
Yippee!
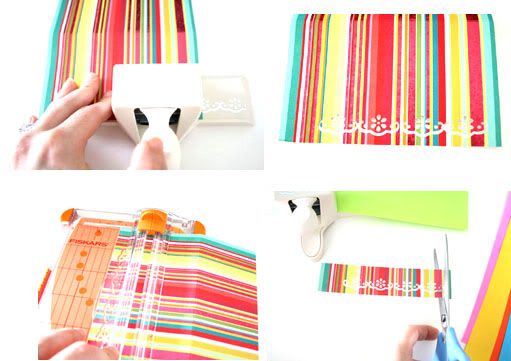
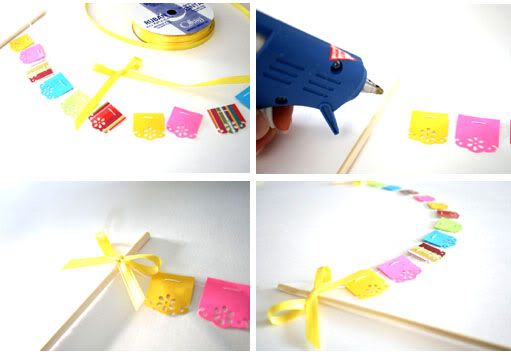
Here is her step by step tutorial...
Photobucket
Supplies
1. Color paper
2. Paper cutter and/or scissors
3. Dye cut paper punch in a pattern of your choice
4. 2 wooden skewer sticks
5. White thread
6. Needle
7. Hot glue gun
8. Ribbon


Step 1: Punch each sheet of color paper with the dye cut paper punch and cut out mini flags with the pattern as the bottom of the flag.

Photobucket

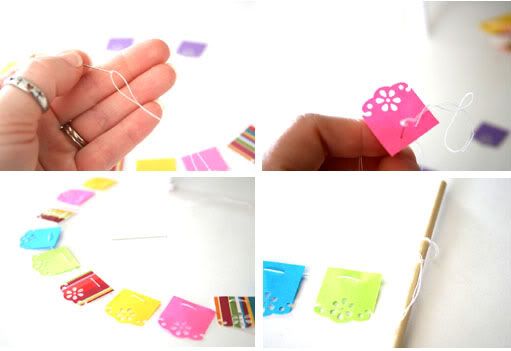
Step 2: Double thread the needle with white string to make the stitch more prominent.

Photobucket

Step 3: Once you have the flags strung and placed however far apart you would like them, tie each end of the string around a skewer stick.

Step 4: Take the ribbon and tie into two small bows.

Step 5: With your glue gun, glue each bow on top of where you tied the thread. This will hold the thread on the stick as well as hide the knot.

Photobucket

Photobucket

Photobucket

Photobucket


{Top 2 images via Kiki LaRu found via Hip Hip Hooray}
All other images via Lovely Scribbles

Wednesday, August 18, 2010

Loving...

I'm loving this invitation from Amelie's House
for a "Pink Party"...
I want a pink party!
Think of all the fun you could have
with this theme...
Tuesday, August 17, 2010

An Elephant Party

Elephants have become quite popular in the party arena...
I can see why...
They are very nostalgic with their wrinkly trunks...
Kelly from The Party Dress just styled the most amazing
elephant party for a boy & girl...
It has sweetness written all over it...
elephant parade circus party dessert table
elephant parade circus party desserts
elephant party favors and stickers


Monday, August 16, 2010

Gearing Up

It's hard to believe that summer is officially over for me...
Preplanning starts today followed by 
the children starting next week...
It's back to teachers, books & dirty looks...
Just kidding...it's going to be great!
Back To School Party Ideas with retro school supplies, desk, black board, pencils, metal lunch boxes, brownies, cookies, and blackboard cupcakes

{images via Top Party Ideas}

Friday, August 13, 2010

Sweet Friday

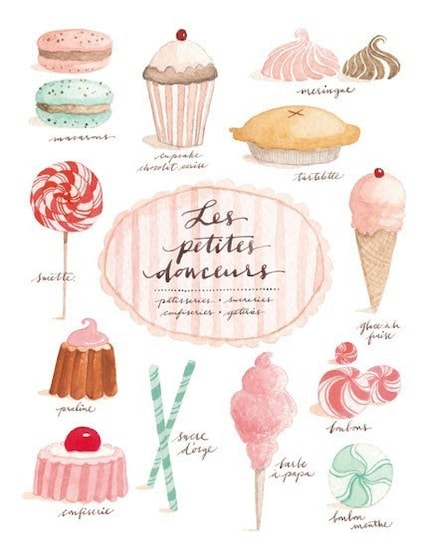
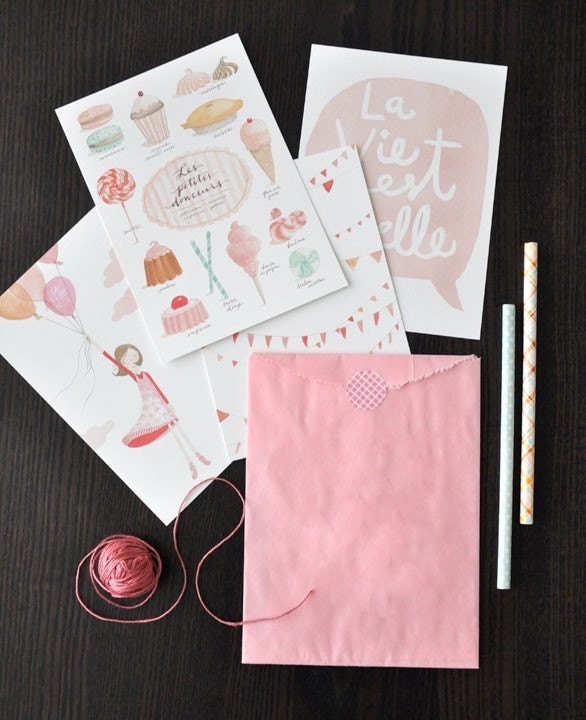
Here are some beautifully sweet prints 
that would make anyone happy...
Les petites douceurs 13x19
These pretties are from artist, Eva Juliet...
You can find her beauties on Etsy...
La Vie est Belle - NOT FOR FRAMING - Set of 4 prints and 1 FREE
I'd like to frame these and put them in a place
where I could admire them all day long...
maybe my classroom?
on the front board?
Just kidding...somehow I don't think my students
would feel the same way as I do about them...
Have a sweet weekend!


{found via Truly Smitten}

Thursday, August 12, 2010

All Aboard!

"Boy" parties are often hard to come up with...
But, I do believe any boy (or person for that matter)
would love this train party put together by Sweets Indeed...
The details are amazing!
train2
Loving the fruit in this box...
train12
I like how she embellished the cones with buttons...
train10
And the flags on the cake pops...too cute!
train8
train7

Wednesday, August 11, 2010

Pretty Pencil Sharpeners

I have been quite busy this week 
setting up my classroom...
I love having all kinds of fun & pretty things
for the kids to use so when I saw these sharpeners
from One Charming Party, I knew I had to share...
Aren't they adorable?
Wooden pencil sharpener, double sided tape,
pretty paper & an embellishment...
Add them all together and voila...

Tuesday, August 10, 2010

A Candy Bar Cupcake

Wait until you see this recipe...
I mean seriously, your mouth is going to start watering...
I'll give you the title first...

Peanut Butter Cookie Cups with White Chocolate Buttercream...

Is that peaking your interest?

How about a pic?
Okay...now read the ingredients...
(First give a big thank you to Cookies & Cups
who shared this most delectable recipe
and gave us step by step instructions with pics!)

1 package peanut butter cookie mix 
12 Reese's Cups

Make cookie dough according to directions on package.
Line muffin pan with cupcake liners and place unwrapped PB cup at the bottom.
Scoop approx 2 Tablespoons dough on top of PB cup
it will yield approx 12 cookie cups
Bake at 325 for approx 20-25 minutes until cookie is set...
Here's how they will look ~
Now here's where nirvana happens:
top with White Chocolate Buttercream.
Oh, you're welcome...

(will frost 36 cupcakes)
18 oz white chocolate chips (about a 12 oz bag and a half)
1/2 cup milk, divided in half
1 cup vegetable shortening
1 cup butter (2 sticks)
2 teaspoons vanilla extract
8 cups sifted powdered sugar (approx 2 pounds)

Cream butter and shortening with mixer
Add vanilla
Gradually beat in sugar, scraping the sides
Icing will appear dry when all sugar is in.
Add 1/4 cup milk.
Beat until fluffy on medium, approx 30 seconds.
In microwave safe bowl 
add white chocolate chips and remaining 1/4 cup milk.
Microwave on 50% power 1 minute, then stir, 
continuing with 30 intervals until chocolate is just melted.
If there are a few lumps, just give it a good stir until they lumps melt, 
DO NOT overheat, you will ruin the chocolate.
When chocolate is melted, add to the prepared buttercream.
Beat in on medium until fully incorporated.
Let cool for 15-20 minutes, then pipe on.
 
Are you running to the kitchen now?
I told you it was spectacular...
Enjoy & Happy Baking!

{images & recipe via Cookies & Cups}