Oh my...
I have a little secret...
A new crush you could say...
Maybe more like an addiction...
I can't stop myself from making them...
It all started when I was designing this...
 The peace, love & pizza party...
I made this sweet pom garland
for the front of the table...
It was all downhill after that...
I was so smitten with this garland
that I would find myself going back over to it
just to admire it...
It was so happy!
Then I made individual poms to use in
the clear vessels as the centerpiece...
They were so soft...so puffy...
and so HAPPY...
The children asked if they could play with them
and take them home...
Much to my dismay, I said "of course"...
Those were MY happy little poms!
So that little party has led me to my new obsession...
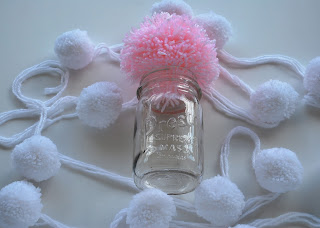 Pom garland, pom flowers, pom toppers, individual poms...
Poms...poms...poms...
The garland looks precious hanging over a mirror
in a children's room...I know...I tried it...
 Little puffs of joy...
 I have poms coming out the ying yang...
You'll definitely be seeing more of my new little sweet peas...
I can't stop myself from making them...
It all started when I was designing this...

I made this sweet pom garland
for the front of the table...
It was all downhill after that...
I was so smitten with this garland
that I would find myself going back over to it
just to admire it...
It was so happy!
Then I made individual poms to use in
the clear vessels as the centerpiece...
They were so soft...so puffy...
and so HAPPY...
The children asked if they could play with them
and take them home...
Much to my dismay, I said "of course"...
Those were MY happy little poms!
So that little party has led me to my new obsession...

Poms...poms...poms...
The garland looks precious hanging over a mirror
in a children's room...I know...I tried it...


You'll definitely be seeing more of my new little sweet peas...